


And then you end up with a big case of The Mehs when you had such high hopes for a cute top/dress using that pretty fabric you just bought (or sacrificed from the stash).
Well first, stop beating yourself up. It happens to all of us and doesn't make you a sewing failure. Sometimes bad things just happen to good fabric and/or techniques. Next, get yourself some elastic thread, like this:

And a big-eyed, blunt-end needlepoint needle, like this (the blunt end is important so you don't snag the fabric and make a difficult task of threading the elastic through):

Cut a LONG piece of the elastic thread, roughly 2-1/2 times the length of the neckline area you need to fix, stretch it a couple of times, and thread your needle with it. Then, push the needle under the stitching that's holding down the neckline/neckband, starting at one shoulder seam.

Make sure you get the needle up into the space above the stitches, like threading elastic through a casing (which is pretty much exactly what this will end up as). Work the needle/elastic through the whole length of the gaping area and leave a long tail on the end you started from (this is why you need to use a long length of elastic).

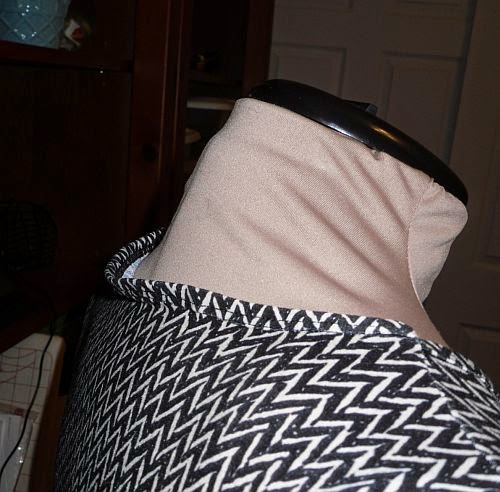
Push the needle out at the back of the other shoulder seam and into/through the serger stitches (or seam allowances if you haven't serged) of the shoulder seam, and ...

... tie a knot. Make sure your knot is behind the shoulder seam, since you've pressed those to the back (right?) and want any elastic tension to pull toward the back.

Next, go back to that long elastic tail you left at the beginning and pull the elastic taut enough to cause rippling but not enough to create actual gathers. The neckline isn't going to lay flat now, but that's OK because it *will* lay flat on you.

And tie it off at the starting shoulder seam, again behind the actual seam. (If you leave your needle threaded while you do this, getting through the loops of the knot is easier.) Finally, unthread the needle and trim your thread tails.

Now be happy again because your new top/dress with that fabric you can't believe you just "wasted" is now a keeper! Look Ma! No gapes and ...

... no gathering.

I won't tell anyone if you won't. ;-)
This little fix works for front necklines/neckbands too. Just run your elastic through the front instead of the back and make your knots in front of the shoulder seams. If you need to fix back AND front, do it in two steps, using two lengths of elastic (or 3, if you have a vee or wrap neck) so you can keep the "drawing up" effect of the elastic separate, which will work better than one long piece of elastic thread doing all the work in different locations.
You're welcome. :-)
Great tip. I had heard it before but no with pictures which really help. Also the tip about keeping the front and back separate if you are doing the whole thing. Hadn't heard that but it makes perfect sense now that you say it.
ReplyDeleteDebbie this is BRILLIANT! I actually made a t-shirt just yesterday that got stretched at the neck band - I thiiink I got it back with steam but this will be so helpful in the future - neckband/neckline gaping is one thing I can't stand on my clothes
ReplyDeleteDebbie, BEST tip EVER! That is incredibly useful - because yes, we've all been there! It will be really helpful for me with my slightly rounded upper back too. Thank you!
ReplyDeleteGenius idea-thank you!
ReplyDeleteGenius! Genius! Genius! Definitely bookmarking this tip. I always have The Gape
ReplyDeleteOh my gosh, BRILLIANT! I've thought about this technique in my head a few times, but never actually done it. Now, you've worked out all the kinks for me!
ReplyDeleteGreat technique!
ReplyDeleteAs others have said, GREAT tip! You always give such thorough instructions and with photos, it is a huge help. Thanks much!
ReplyDeleteGreat tip. I'll have to remember this one!
ReplyDeletethank you, thank you, thank you.
ReplyDeleteWowzers. Thank you for sharing this picture tutorial. I already own elastic thread thanks to many 50% off notions sales and Wawak.
ReplyDeleteAmazeballs, that's all. AMAZEBALLS.
ReplyDeleteGreat tip - thanks!
ReplyDeleteWow Debbie, what a GREAT fix to an annoying problem!! I'm filing that one away in my brain!
ReplyDeleteWhat a brilliant idea - I hadn't heard this tip before, will definitely keep it in mind for the next time this happens to me :)
ReplyDeleteGenius. Thanks.
ReplyDeleteThis is a fantastic tip! Thank you for sharing!
ReplyDeleteThanks for the tip! So simple, but brilliant!
ReplyDeleteGreat tutorial, Debbie!
ReplyDeleteExcellent tip, thank you!
ReplyDeleteSuper useful. Awesome!
ReplyDelete������ just brill!
ReplyDeleteSorry those empty squares were supposed to be clapping hands. Anyway thanks for posting this.
ReplyDeleteAs everyone else has said - brilliant! Thanks for sharing - my knit tops often turn out gaping which annoys me no end, so i'll be keeping this one in mind
ReplyDeleteBrilliant! Genius! I'm trying to think of a word someone else hasn't used and can't. THANK YOU SO MUCH!!!!
ReplyDeleteWhat they said. I just had to come over from feedly to say thank you!
ReplyDeleteAdding my voice to the chorus of others, thank you! What an efficient yet simple technique to get the desired result!
ReplyDeleteWhat they said. Thank you for the pics.
ReplyDeleteWOW! Thanks Debbie!
ReplyDeletedesigndreamer
Brilliant. I have a top I need to do this on now.
ReplyDeleteGreat tip - thanks Debbie! I'm bookmarking this one, too.
ReplyDeleteAwesomeness!!!
ReplyDeleteBest tip I've gotten in a long while! Just Brilliant, Debbie. Thanks.
ReplyDeleteAwesome ! ! !.... Thanks for a fabulous tip.
ReplyDeleteThank you! You get the best tip tutorial award!! Of course, I doubt that I'll need it. Yea, sure - only several times a year!
ReplyDeleteAwesome tip. Thanks for sharing.
ReplyDeleteGreat tip! Thank you so much!
ReplyDeleteGrand idea. I have back neckline that hasn't been coverstitched yet, but looks suspicious. Now I know how to fix it no matter what.
ReplyDeleteThis is a great tip. I have also used it on sleeveless arm holes that gape just a little too much and on cross over tops that don't lay flush to the skin.
ReplyDeleteYou are a lifesaver, the dress I'm making at the moment is looking like I'm going to be using this technique on. Perfect timing.
ReplyDeleteOh wow what a brilliant tip! THANKYOU THANKYOU THANKYOU
ReplyDeleteTHIS IS AMAZING!!!! (all caps to emphasize the amazingness :) )
ReplyDeleteThanks for the tip. I'll try this on a knit top which gaped at the front.
ReplyDeleteBrilliant! Really Brilliant!
ReplyDeleteYou are a genius!!!!! What a great tip, one I will use on at least three tops at present. What a great fix idea.
ReplyDeleteThanks for posting this tip. I have a blouse that is very close to becoming a wadder. This might just save it.
ReplyDeleteThis is an awesome tip thanks for sharing!
ReplyDeleteYou are brilliant!
ReplyDeleteI'm late seeing this, but it's getting filed in my sewing tutorials file. Thanks!!!
ReplyDeleteBrilliant tip!
ReplyDeleteThank you so much. You saved my dress. The neckline ended up much larger than I expected. I actually thought I would have to take my dress apart to do some alterations. Clueless as to what I would do, in my search I found your tutorial. I am very grateful.
ReplyDeleteWould this work on a woven?
ReplyDeleteAbsolutely brilliant. Why is it that when I was trying to resolve a gaping problem, that this never popped up. You need to write a book, seriously? I'd be first in line.
ReplyDeleteI learned so much from your instructions, thank you! I hope you don't mind, I have included a link to this post in my latest blog entry on www.sewgingerpatterns.com. If you would like me to remove the link, please let me know.
ReplyDeleteThank you so much this is such a great fix, I have my first ever jersey top finished but it's got a bit of gape. I will give this a go. Thank you so much.
ReplyDeleteThanks so much. It works! It saved my garment from being put in the back of the closet or throwing away.
ReplyDeleteThanks for this! I haven't tried it yet but the directions and pictures look very promising. I never knew there was such a thing as elastic thread! thanks again.
ReplyDeleteJust discovered this blog. The above tip is genius! I have just finished a top, my first jersey attempt, I have a frontal sag at the neck and this will sort it out. Thanks so much, you are clever.
ReplyDeleteWhat if it is a neckline with a binding and it's a challis not a knit?
ReplyDelete(Sorry for the delay.)
DeleteSince the goal is to pull the neckband taught enough to pull it in but not so tight as to create visible gathering *while being worn* (it will look gathered while off the body), this same "trick" should work for wovens too.
Thank you! I am glad I am not alone!!!!
ReplyDelete